


Casa Bahia Homeowners Association Policies & Procedures
In the late nineties, our board began to document the procedures that were being used to conduct the business of the Association. We now have 11 approved Policies and Procedures to assist the board and homeowners in conducting Casa Bahia business.
The Policies and Procedures help board members ensure that our association maintains a consistent way of conducting its business and enforcing the Rules and Regulations and CC&R's, regardless of who is serving on the board. They also provide additional information and guidance on subjects that most homeowners are concerned with, such as replacement of windows and doors, building water turn-off procedures and unit modifications.
Shown below is a list of our approved Policies and Procedures. These P&P's may be downloaded by clicking on the applicable "Down Load File" symbol that precedes the Policy you want.
P1 - Writing Board Policies and Procedures
P2 - Major Project Planning and Implementation
P3 - Use of Gas Appliances in Individual Condominium Units
P4 - Board Secretary Job Description and Responsibilities
P5 - Building Water Shut off Procedure
P6 - Welcome Committee
P7 - Parking Space Rentals By Tenants
P8 - Garage Storage Locker Expansion
P9 - Sliding Glass Door and Window Replacement
P10 - Homeowner Condominium Modifications
P11 - End of year Allocation of Unused Funds
P12 - Decision-Making Criteria For Board Members
P13 - Condominium Floor Covering Requirements
P14 - Cleaning Kitchen Vertical Lines & Horizontal Main Lines
P15 - Homeowner's Financial Committee
P16 - Board Emergency Procedures ( Pending Approval)
P17- Weekend Emergency Guidelines
P18-Water Leak/Emergency Response
P19-Attendance At Board Of Director Meetings
P20-Digital Locks For Homeowner Unit Doors
P&P No. 1, Rev 1
6 Jan 99
CASA BAHIA POLICES AND PROCEDURES
| policy_1.pdf |
Subject: Writing Board Policies & Procedures #1
Purpose: This establishes the procedure to be used to document the Policies and Procedures (P & P ) which are used by the Board and Homeowners and are created by the Board of Directors.
Description: The Board of Directors shall document the Policies and Procedures which they used to conduct the business of the Association. This will assist in insuring that the Board acts consistently over time and creates a business and management system and legacy for future boards.
Procedure:
1. In the course of conducting Association business, the Board of Directors directly and indirectly creates Policies and Procedures dealing with the many facets of implementing the CC&R's and the Rules and Regulations. Policies and Procedures are extensions of these documents and provide additional information which support the implementation of these documents. The are utilized in conducting Board meetings, managing building projects, formulating budgets, controlling costs, determining owner/Association responsibilities, maintaining security, defining management responsibilities and other areas of Association business.
2. Board members usually divide the broad areas of Association responsibilities into more specific and manageable tasks and assign aboard member to be responsible for selected area. Each of these tasks may require more specific information in the form of a Policy and Procedure. These areas could include:
a. Board Policy Manager
b. Building Calendar Monitor
c. Move in/out Coordinator
d. Newsletter Publisher
e. Insurance Reviewer
f. Files Room Manager
g. Welcome Coordinator
h. Reserve Fund Manager
I. Building Contracts Reviewer
j. Emergency Focal Point
k. Monthly Cost Tracker
l. Routine Maintenance Monitor
m. Water Shutdown Monitor
n. Architectural Committee Coordinator
o. Monthly Meeting Coordinator
p. Security Monitor
q. Monthly Walk-thru Scheduler
r. Delinquent Accounts Action Officer
3. The Board member assigned to a specific area of responsibility should consider whether the area requires a P&P, and if it does, the Board member should then draft the P&P for Board review and approval. 4. After the P&P is approved, it should be given to the Board Secretary to be maintained in a P&P book.
| policy_2_2.pdf |
P&P No. 2, Rev 1
Date: 6 Jan 99
CASA BAHIA POLICIES AND PROCEDURES
P&P No. 2, Rev 1
Date: 6 Jan 99
CASA BAHIA
POLICIES AND PROCEDURES
Subject: Major Project Planning and Implementation
Purpose: This procedure describes the steps that can be used to successfully accomplish major building improvement projects.
Descriptions:
A major project is defined as costing $2,000 or more. A successfully completed project is one that meets the objectives cited in the plan, statement of work or contractor's proposal and is accomplished on schedule and within the cost estimate..
Procedure:
1. One Board member should be designated as the Project Manager (PM) and assigned responsibility for the successful completion of the project.
2. The PM should initially prepare a plan for the accomplishment of the project which would include the objectives of the project, a description of the work to be done, a schedule, the estimated cost and the source of the funds. Attachment 1 is an example of a Plan. The board should review and approve the Plan.
3. The PM should prepare a Statement of Work (SOW) which describes the project requirements and is to be used by the contractors to prepare their proposals. Using a SOW will insure that all the contractors bid on the same work thereby allowing their costs to be directly compared. The SOW should be approved by the board. Attachment 2 is an example of a SOW.
4. A minimum of three (3) proposals should be obtained for major projects.
5. The PM can, for high value complex jobs, ask for the assistance of two (2) other board members or homeowners to help in the evaluation of the contractor's proposals. This should include checking references and prior job sites for similar type jobs.
6. The PM should insure that all the provisions of the SOW are included in the contract and then monitor the contractor's work on a daily or week-to-week basis. The PM should report progress to the board at the monthly meetings.
7. The PM is responsible to authorize payment to the contractor through the
management company. No payment will be made without his/her authorization.
8. Before final payment is made, the PM will report to the board that all the project requirements have been met.
2 Attachments:
1. Project Plan Example
2. SOW Example
P&P No: 2
6 Jan 99
Attachment 1
PROJECT PLAN EXAMPLE
I. General Description Of Project.
This paragraph provides background information and a general description of the project. Included in this paragraph is the reason for the project and they the scope of the project i.e.what will include and what it will not include. Also included should be the contracting approach i.e. the number of contractors to be solicited and if the project is to be done in steps or phases.
II Description of Work.
This paragraph describes the work that will be done. The work description should be broken down into discrete taskswith an explanation for each task the contractor will perform. Also included should be an assessment of the risk involved in completing the project i.e. The likelihood of schedule slips and cost growth.
III Schedule for Project.
The planned schedule for the project should be shown to include start and end dates as well as major milestones.
IV Cost Estimate of Project.
The estimated cost of the project should be shown in as much detail as possible. The approved budget for the project should be shown. The amount of contingency funds in the approved budget to cover possible project cost growths should also be identified.
V Special Considerations.
If the project require special notifications to homeowners, a permit from the city, or engineering drawings, these should be called out and accounted for in the schedule and budget.
P&P No. 2
6 Jan 99
Attachment 2
STATMENT OF WORK EXAMPLE
Title of Project
Casa Bahia Homeowners Association
535/555 Esplanade, Redondo Beach
I. The Problem.
Describe the need for the work and provide a general description of the project. The use of photographs and drawings is an excellent way for the contractor to understand the scope of the project.
II. Description of Work
Describe the work the contractor must do in as much detail as possible. A key point here is to focus on what must be done not on how to do it. Provide the contractor with as much detail as possible concerning each task that must be accomplished. Dimensional drawings and photographs should be included if appropriate.
III. Proposal Requirements.
Use this paragraph to tell the contractor what he must include in his proposal.
This might include such things as; a cost breakdown for each task, a timeline for each task, the cost for pulling city permits, the schedule on which the contractor will be paid ( i.e.for example,10% at contract signing, 10% at various project milestones and the remaining 25% after the work has been approved by the Association ) , and the extent of the warranty that he will provided. Also include the allowable work hours and the other rules the contractor must follow when working at Casa Bahia.
If the work is complex, a lien release should be required and state the qualifications the contractor must have to bid on the job, such as, a state license, a city of Redondo Beach license and the required insurance policies. State whether or not this statement of work is to be included in his proposal. State when the proposal is due.
Request that the contractor include the names and the addresses and phone numbers of prior customers for whom he has done similar work so that you can check references.
IV. Contact Information.
State who the contractor is to submit his proposal to ( the management company ) and who he may contact if he has questions about the statement of work or the project. Be sure to provide phone and e-mail contact information.
P & P No. 3
Date: 7 June 99
CASA BAHIA POLICIES AND PROCEDURES
| policy_3.pdf |
SUBJECT: Use of Gas Appliances in Individual Condo Units
PURPOSE: To Establish a Policy Governing the Use of Natural Gas Appliances in Individual Condo Units
POLICY:
1. The only gas appliance to be connected to the building natural gas supply in individual condo units is the single “decorative” gas fireplace rated at 15,000 BTU/hr or less. Changes to the building gas system are not permitted.
2. Unit owners who have received approval from prior Boards to install other types of gas appliances in their units may retain those appliances for as long as they own the unit providing the meet all of the following criteria:
a. Written proof of prior Board approval
b. City permit and safety inspection
c. Make monthly payments for gas usage starting 1 Sept 99. The fee will be determined by the
d. Sign an agreement with the board that all gas appliances will be removed prior to the sale
3. Owners who have installed additional gas appliances in their units and do not meet the criteria set forth in paragraph 2, must contact the Board/Management company by 1 Sept 99 and identify the gas appliances they have. A Board representative will then work with the owner to develop a plan and time schedule for the removal of the gas appliances. A safety inspection will be conducted after the unit has been returned to its original (i.e. single fireplace) gas plumbing configuration.
4. Owners who fail to acknowledge additional gas appliances in their units by 1 Sept 99, will be assessed $25./day starting retroactively 1 Sept 99, until the gas appliances are removed. A safety inspection will be conducted after the unit has been returned to its original gas plumbing configuration.
RATIONALE:
1. The Casa Bahia natural gas system was designed and sized to support only the use of a single decorative gas fireplace (i.e. less than 15,000 BTU/hr) in individual condo units. The 1” diameter gas feeder pipes in the building are too small to permit adequate gas flow to safely operate multiple gas appliances in individual units. The use of multiple gas appliances in condo 2 units which are fed from the same 1” gas supply line will cause the gas fireplaces to go out and may damage other gas appliances by causing them to operate below their rated capacity.
2. The Casa Bahia natural gas system has one gas meter for the entire building. The monthly Condo Association Fee covers the cost to operate a single gas fireplace in each unit plus the prorated cost to operate the building hot water system and the Jacuzzi system. Since there is only one gas meter, there is no accurate way to access the cost to individual owners for the operation of additional gas appliances (assuming the building plumbing system could support them). The other homeowners would, therefore, be paying for the additional gas usage of homeowners who have installed additional gas appliances. This is an inequitable situation.
3. The CC&R’s require that when a homeowner makes major changes to their units that involve structural, electrical, or plumbing changes, the homeowner must obtain a city permit and a city inspection. This is a safety requirement and insures the safety of the building (and your investment) but more importantly, you and your family. Modification to the gas plumbing system within individual condo units is not permitted. Changes to the other systems are a safety issue and therefore, requires a safety inspection.
P&P No 4
Board Secretary Job Description and Responsibilities
27 December 1999
P&P #4
| policy_4.pdf |
CASA BAHIA P&P No. 4, Rev 1
POLICIES AND PROCEDURES 27 Dec. 99
Subject: Board Secretary Job Description and Responsibilities
Purpose: This describes the duties and responsibilities of the Board Secretary
Description:
The Board Secretary shall be responsible for accomplishing the following tasks:
1. Insure minutes of all Board meetings are accurately recorded and approved.
2. Insure minutes of regular Board meetings are available within 30 days and are
posted in the building lobbies.
3. Insure announcements and agendas for regular Board meetings are posted at least
five days before the meetings.
4. Maintain Board/Association Minutes Book which contains the approved minutes
of all Board meetings.
5. Maintain and keep current the Board File Room. Insure that each month a copy of
the Board package plus any back-up materials and correspondence is filed. The File Room is the
library and repository for all Association business documents.
6. Maintain a current list of homeowners and residents with contact information.
7. Unless otherwise directed, maintain the Board Annual Calendar and insure that
items are accomplished as scheduled.
8. Write and promulgate Policies and Procedures which reflect and document the
decisions and practices of the Board. This will assist and insure consistent & uniform Board
actions.
9. Maintain the Board Policies & Procedures book.
10. Unless otherwise directed, maintain a list of all active committees.
11. Advise the management company that Board members should receive their board
meeting packages at least five (5) days in advance of all scheduled meetings.
12. Advise the Board chairperson that board meetings should be conducted in
accordance with parliamentary procedure and that the following protocol should be observed:
a. Time sensitive agenda, start and finnish on time.
b. Chairperson runs the meeting, only one person in charge.
c. No surprises - all agenda items to be reviewed by Board members before the
meeting.
d. One person has the floor at a time.
e. No Board discussions without a motion.
f. Keep meeting businesslike and nonpersonnal and non confrontational.
13. Unless otherwise directed, schedule Board members for the monthly building
walk through. Maintain monthly building walk-thru schedules.
P&P No. 5
Building Water Shutoff Proceedure
13 October 2005, Rev 5
| policy_5.pdf |
P&P No. 5
Date: 13 Oct. 05
Revision 5
CASA BAHIA
POLICIES AND PROCEDURES
SUBJECT: Building Water Shutoff Procedure
PURPOSE: To document the building water turnoff and turnon procedures and assign responsibilities.
POLICY:
1. Since there are no individual unit water turn off valves, building residents must request authorization to turn off
the building main water supply when necessary to accomplish repairs and/or replacement of the plumbing and/or
plumbing fixtures in their units. Modifications require Board approval and may require a city permit.
Homeowners must first obtain Board approval and then make a water turnoff request to the building management
company, either in writing or by telephone, at least 48 hours before the planned water turn off.
2. In order to minimize the number of times per month the building water is shutoff, which is an inconvenience to
the residents, the board has designated the second Wednesday and fourth Tuesday of the month as building water
shutoff day. All homeowners must schedule any plumbing work which requires water shutoff on this day starting
at 10:00 a.m. and completing before 3:00 p.m. This starting time is so that any unforeseen problems can be solved
before the end of the day.
3. After obtaining management company approval, homeowners must post four (4) turnoff notices, one in each
elevator and one on each lobby bulletin board, at least 48 hours prior to the turnoff (i.e., no later than Monday
morning before 10:00 a.m.). Only the official Casa Bahia notice for is to be used (Attachment 1). The form may
be obtained from the management company or a board member.
4. Residents must use a licensed plumber to accomplish the turnoff and turnon procedures. Bert Meli Plumbing
(310-530-3427) may be used as they are familiar with the building system and have keys to the heater room. This
will eliminate the need for the homeowner to coordinate access to the heater room with a board member so that the
three recirculation pumps can be shut down.
5. In an emergency plumbing situation the homeowner should immediately contact the management company
and/or a Board member, to receive authorization to immediately shut down the building water supply. An
emergency situation is defined as running water from a broken water pipe or valve which is damaging property and
which can only be stopped by turning off the building water supply. After authorization is provided and the water
shut off, the homeowner must post 4 (four) emergency notices to alert the other residents as to the situation and
the time when water will be restored. The homeowner’s unit number and phone number must be on the notice.
6. There will be a $50.00 charge for any additional shut off, other than an emergency, to offset the expense to the
HOA for utility costs in water and gas.
RESPONSIBILITIES:
The Management Company:
Authorize the homeowner to turn off the building water.
Provide the homeowner with the "Building Water Shutoff Procedure," P&P No. 5.
Designate the first homeowner requesting permission to shut off the water as "lead homeowner" and their
plumber as "lead plumber".
Explain to the homeowner their responsibilities as "lead homeowner."
Insure that the "lead plumber" designation is marked on the shut off notice.
Homeowner:
Must obtain authorization from the management company
Must obtain and comply with the Policy and Procedure.
Must use a licensed plumber for all work. If a plumber other than the building plumber, Bert Meli, is used,
it is the homeowners responsibility to coordinate access to the heater room with a board member so the
recirculating pumps can be turned off and restarted by their plumber.
If designated "lead homeowner" will be responsible for any damage to the building system or individual
units due to improper turnoff procedure or premature water turn on.
Will be held liable and will be fined if their plumber fails to check in with the lead plumber or fails to
provide the lead plumber with a signature after their work is completed.
Must post the approved shutoff notice on the bulletin boards and in the elevators 48 hours before theplanned turn off.
Must obtain prior board approval if modifications are being made to the unit plumbing system. If in doubt,
contact a board member or the management company.
Must obtain a city permit if any modifications are being made to the unit plumbing system. If in doubt, call
the City of Redondo Beach, Building Permits, 310-372-1171
Must remove signs after water has been turned back on.
Will be held financially responsible for any damage or liabilities which occur due to improper turn off or
turn on procedures.
Lead Plumber:
Will start work at 10:00 a.m.
Will turn the building water system off at 10:00 a.m. and back on when all other plumbers, approved to work in
the building that day, have completed their work. This will be assured by obtaining a written "sign-off" from each
plumber on the "Lead Plumber's Sign Off Sheet" (Attachment 3) before turning the building water back on.
May reassign "lead plumber" responsibilities to a secondary plumber if the lead plumber has completed his
work but another plumber requires addition time to completed his work. Reassignment is accomplished by both
plumbers signing the reassignment section of the "Lead Plumber Sign Off Sheet." Must assure that the plumbe
assuming the lead plumber responsibilities understands his responsibilities and the procedure for turning the water
back on. Must immediately report the change in lead plumber to the management company.
Secondary Plumbers (i.e., a non lead plumber approved to work in the building):
Will start work at 10:00 a.m.
Will "Sign In" with lead plumber and provide cell phone number and estimate of completion time
Will "Sign Out" with lead plumber when job is completed
May assume the lead plumber responsibilities if they are to be the last plumber working in the building.
WATER TURN OFF AND TURN ON PROCEDURES:
1. Before the building water supply is turned off, the three water recirculation pumps must be turned off. This
prevents the pumps from running dry and burning out. The three recirculating pumps are located in the locked
Heater Room on G-1. The resident must make arrangements with the management company or a Board member
for access to the Heater Room on G-1.
2. The turnoff switches for the first two recirculation pumps are located on the boiler, which are the second and
third units to the left as you enter the Heater Room. The switch is on the front of the boiler. The turnoff switch for
the third pump is located in the far left corner on the street facing wall and is located below the electrical box
marked “Equipment Room Sub panel.” It is a single uncovered switch on the wall labeled “Recirc Pump.” Afte
all three switches are off, proceed to the main water valve.
3. The main water shut off valve for the entire building is located on the east (street side) wall of G-1, to the left of
the garage gate, by parking space #162. To shut down the building water,
slowly turn the big horizontal wheel on the red valve clockwise, which is located on the right side of the blue inline
section of pipe. Keep turning the valve until it hits the stop. The building water is now off.
4. To turn the building water back on, reverse the shutdown procedure. Turn the wheel on the red valve
counterclockwise very slowly one revolution and then wait 20 seconds. Turn the wheel one more revolution, then
wait 20 seconds. Continue this procedure until the valve is all the way open. Slowly opening the valve this way
will prevent the rush of water from blowing open a pipe or otherwise damaging the system. After the valve is all
the way open, close it one revolution. Turn on all three recirculation pumps.
Date: ___________
Attch 3 P&P #5
CASA BAHIA
LEAD PLUMBER SIGN OFF SHEET
THE LEAD PLUMBER IS:
NAME COMPANY UNIT # PHONE # EST.
COMPLETION TIME
THE SECONDARY PLUMBERS ARE:
NAME COMPANY UNIT # PHONE # EST.
COMPLETION TIME
1.
2.
3.
4.
5.
JOB COMPLETION SIGN OFF
COMPLETION
NAME COMPANY UNIT # PHONE # TIME SIGNATURE
1.
2.
3.
4
5.
LEAD PLUMBER REASSIGNMENT
I am still working in Unit # ________ and I will assume the Lead Plumber responsibilites. I will not turn the building water back on until
I have confirmed that all plumbers have completed their work and have signed this sheet.
TIME
COMPLETION TIME
P&P No. 6
Welcome Committee
3 October 2000
| policy_6.pdf |
1
Policy & Procedure No. 6
3 October 2000
CASA BAHIA
POLICIES AND PROCEDURES
SUBJECT: Welcome Committee
PURPOSE: To document the procedures to be used by the Welcome Committee. The purpose
of the Committee is to make the new resident feel at home, answer any questions they may have,
assist them with the move in process and ensure that they have a copy of and understand the
Rules and Regulations.
POLICY: The Welcome Committee is composed of at least one Board Member, which acts as
Chair and homeowner volunteers as available. The Welcome Committee acts for the Board in
meeting with each new homeowner/resident to the building.
PROCEDURES:
1. New Owners:
A. The Management Company will send to the new owners as part of escrow the
Welcome Letter (Attach. 1) and the Rules and Regulations (Attach. 2) and ensure that the $200.
move-in/out fee is included in escrow instructions.
B. The Management Company will contact the Welcome Chair with new owner’s name
and move in date. If new owner doesn’t initiate contact in advance, Welcome Chair contacts
them to arrange meeting date. At the time of the meeing, Committee representative will verify
that Rules & Regulations and Welcome Letter have been received and go over the list of Do’s
and Don’ts.
C. Management Company advises Welcome Chair when move-in/out fee has been
received. Entry System Chair programs telephone.
2. New Tenants:
A. Unit owners are required to provide the Rules and Regulations to their tenants,
including move-in requirements and to alert the Management Company of the pending move.
Since this rarely happens, the Board and Welcome Committee should be watchful of any movein/
out activity and report it to the Management Company and the Welcome Chair with date and
unit number. The Welcome Committee should be prepared to handle any unannounced moves.
B. Welcome Chair will authorize the Management Company will send a letter to the
owner (Attach. 3) to advise him of the $200. move-in/out fee when a new tenant (including
roommate changes) moves in (and a $25. non-compliance fine for unannounced moves). The
entry system will not be programmed until the fee is paid. If the system is already connected and
the fee is not paid within 30 days, the entry system will be disconnected.
2
3. Resident Activity Log: The Committee keeps a log of dates of move-ins/outs, names of new
owners and residents and documents meeting dates of Committee meeting with new residents.
4. Welcome Committee Assists New Resident: Helps with move in entry, including garage door
opening, etc., and goes over the Do’s and Don’ts. Give new resident a folder with the following
information:
a.Management company-contact information
b.Gives board member list to new owners; non-resident owners are responsible for
contacts/requests to board for their tenants
c.List of Do’s and Don’ts
d.Rules and Regulations, if they don’t have them already
e.Last Newsletter
f.Redondo Beach City Newsletter-Recreation & Community Services
P&P No. 7
Parking Space Rentals By Tenants
14 May 2002
| policy_7.pdf |
Policy & Procedure No. 7
14 May 2002
CASA BAHIA
POLICIES AND PROCEDURES
SUBJECT: Parking Space Rentals by Tenants
PURPOSE: To prevent disputes amongst the Association, owners, tenants and the management
company involving responsibility for the rentals fees for parking spaces owned by the
Association.
PROCEDURE: If a tenant wishes to rent an additional parking space, he must request from the
unit owner that a letter be sent to the management company agreeing to have the rental fee posted
to his account and that he is responsible for payment. The owner will be responsible for paying
the Association for all dues and rentals. The tenant will pay the owner directly. The owner must
notify the management company in writing if he wishes to terminate the parking space rental.
P&P No. 8
Garage Storage Locker Expansion
29 June 2002
| policy_8.pdf |
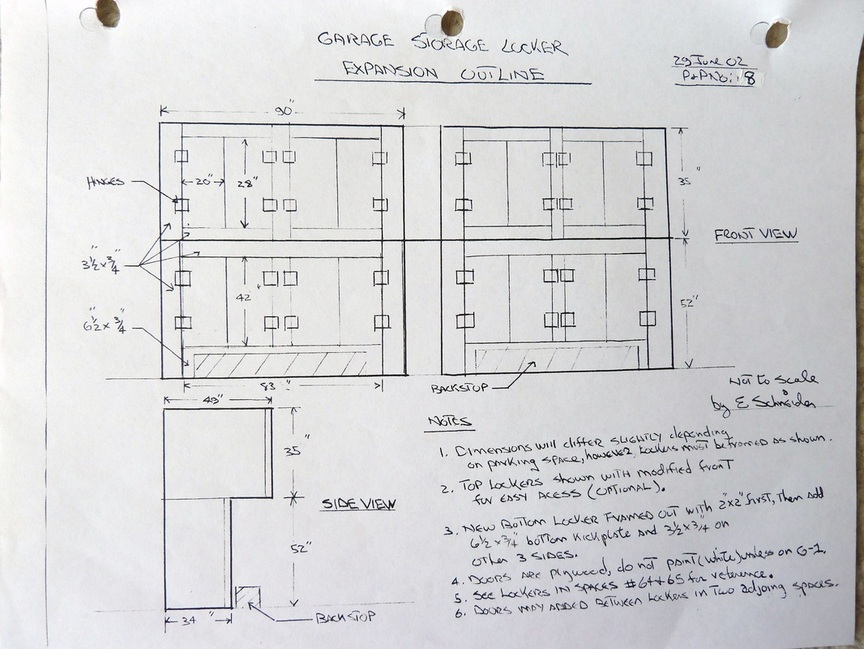
P&P No: 8
29 June 2002
CASA BAHIA
POLICIES AND PROCEDURES
Subject: Garage Storage Locker Expansion
Purpose: This procedure describes homeowner requirements to receive Board approval to
expand their garage storage lockers.
Description: Casa Bahia homeowners have two assigned parking spaces with one storage
locker for each parking space. Most of the lockers are mounted on the garage wall,
approximately 52” above each assigned parking space and are generally 90” long 36” high and
49” deep. This design allows the hood of cars to extend under the lockers so that longer cars and
SUV’s will not extend out into the access/traffic areas.
Requirements:
1. Homeowners may request the Board to approve expanding one or both lockers by adding a
bottom section to the existing design. They may also request changing the front of the top
existing locker to provide better access to stored items.
2.The Board will consider approving the homeowner request provided the following conditions
are met:
A. A dimensioned drawing is submitted which conforms to the outline drawing contained in
the attachment.
B. The depth of the bottom locker may not extend out past the parking backstop,
approximately 35”.
C. A parked vehicle may not extend into the traffic lane, a maximum of 19 feet from the
garage wall.
D. If, at any time, a homeowner has a vehicle which extends more than 19 feet from the
garage wall because of the existence of a bottom locker, the Board will require that the
bottom locker be removed.
3. It is the homeowners responsibility to acquire and maintain written proof that the locker
expansion was approved by the Board. Failure to produce proof to current/future Boards may
result in having to return the locker to its original configuration.
4. Some parking spaces contain vents and/or pipes or would interfere with access to an adjacent
space which would prevent Board approval of a bottom locker.
1 Attachment: Garage Storage Locker Expansion Outline
P&P No. 9
Sliding Glass Door and Window Replacement
29 January 2002
| policy_9.pdf |
1
CASA BAHIA POLICIES AND PROCEDURES
Subject: Sliding Glass Door and Window Replacement
Purpose: To document the requirements and provide homeowner guidance concerning the
replacement of sliding glass doors and windows in individual condominium units.
Policy:
The following requirements must be met when replacing sliding glass doors and windows:
1. Only anodized aluminum frames, silver (clear) in color and of similar dimensions (1 ½
inches) and of the same configuration may be used. Vinyl frames may not be used.
2. The replacement doors and windows must not change the appearance of the exterior of the
building in any way.
3. A contractor in good standing, with a current license which covers window replacement
must be used. It is the homeowners responsibility to verify the contractors license, that he is
bonded and carries workers compensation insurance. The California State License Board can
provide information as to a contractor’s current license and standing with the Board. They
may be contacted at www. cslb.ca.gov
4. Any damage to the building as a result of the installation must be repaired at the
homeowner’s expense. The stucco, exterior wood, etc., must be returned to the preinstallation
condition.
5. The window glass may be clear or ordered with a light gray tint only. Reflective tints or
other tint colors are strictly prohibited. The gray tint must have a visible light transmittance
of 50% or greater to prevent reflections from the glass. Adhesive or stick on tinted coatings
are not allowed by the CC&R’s. (Article III paragraph 3 ).
6. Those units on the street side of the building which have jalousie (louvered) windows may
elect to change them to a single hung vertical window with two equal sized panes.
7. The contractor must remove all building materials from the building. Use of the building
trash containers is not permitted.
8. Those windows in wood frames must be replaced in wood frames.
9. If you have any doubt as to the door or window replacement that you are considering is in
compliance with this published standard, please consult with the Board before placing your
order.
Options:
For those homeowners for whom outside noise is a concern, an upgrade to dual pane windows
with 12/4” over 1/8’ glass will reduce noise levels significantly.
Additional thermal insulation may be obtained by adding Argon gas between dual panes and/or
Low E2 glass.
2
Rational Associated with Sliding Glass Door and Window Replacement Policy:
1. Our CC&R’s (Article III, Paragraph 3) state that individual homeowners are responsible for
the maintenance and replacement of their sliding glass doors and windows. The CC&R’s
(Article III, Paragraph 15) also state that homeowners may not modify the exterior of the
building. In order to maintain a uniform and consistent look to our building it is necessary to
limit the replacement of sliding glass doors and windows to aluminum frames.
2. While the Board policy has always been that replacement windows and doors must match the
existing hardware, several homeowners over the past few years have asked the Board whether
vinyl may be used. In 2000, a committee was formed to investigate the problem and they
reported that vinyl cannot be obtained in an aluminum color. The Board then confirmed its
policy that aluminum must be used and that vinyl is prohibited. In 2002, the subject of vinyl
again came up and a larger committee was formed to determine if there was a significant enough
performance advantage of vinyl over aluminum frames to justify a change in the Board policy.
This would mean we would have to live with multicolored frames (i.e., aluminum color and
either white or almond vinyl) on the outside of the building. Painting the vinyl is not an option
since the paint will not stick.
3. The 2002 committee recommended that the Board stay with aluminum frames. This was
based on the following facts:
A. The major performance advantage in replacing our original windows and doors is due to
the characteristics and configuration of the glass, not the frames. Windows can account for
33% of total heat loss in winter and as much as 75% of heat gain during summer
B. The frames comprise less than 13% of the total window area for a triple window/sliding
door combination measuring 79” x 105 ½ “. For the larger combinations this percentage is
much smaller.
C. By replacing the original single pane glass windows and doors with double pane (1/8 over
1/8”), LowE2 glass in an aluminum frame, the following advantages can be achieved:
NFRC (National Fenestration Rating Council) Single Pane Double Pane LowE2
U Factor (range of heat loss) .90 .55
(.2 good to 1.2 bad)
Solar Heat Gain Coefficient .87 .39
(heat from sun blocked)
(.2 good to 1.0 bad)
Visible Light Transmittance .90 .70
(amount of visible light passing through)
(0 no light to 1 all light)
Sound Transmittance 25 29
(need 31-37 to suppress moderate street
noise)
3
4. Aluminum frames are 4 times stronger than vinyl and about 25% less expensive. Aluminum
frames are rated the same as vinyl to withstand up to 134 mph winds and are rain resistant up to a
43 mph wind. Vinyl does have two distinct advantages over aluminum, the U factors are
approximately 20% lower and the surface appearance is more durable. Aluminum will oxidize as
it gets older and the surface finish will become dull. In other performance areas, vinyl and
aluminum are virtually the same. However, in addition to not being available in silver, the vinyl
frames are considerable wider than aluminum frames to increase their structural strength. This
would also have the effect of changing the outside appearance of the building.
.
P&P No. 10
Homeowner Condominium Modifications
9 September 2006, Rev 2
| policy_10.pdf |
P&P No. 10
Homeowner Condominium Modifications
16 May 2004
CASA BAHIA
POLICIES AND PROCEDURES No. 10
16 May 2004
Subject: Homeowner Condominium Modifications
Purpose: To provide Board members and homeowners with guidance for obtaining approval for any modifications or improvements to individual condominium units.
Policy:
1. Before doing any work in their units, other than routine maintenance*, homeowners must obtain written permission from the Board for all modifications they plan to make to the condominium units.
2. In order to obtain written permission from the Board, the homeowner must apply to the Board in writing for permission. The homeowner’s letter to the Board must be similar to the example on page 4, and contain the following information;
A. A detail description of the changes to be made.
B. A detail drawing, containing dimensions and materials to be used, in accomplishing the requested work.
C. A statement from the City of Redondo Beach, Building Division, stating that the homeowner's letter and drawings have been reviewed and building permits are either required or not required for this work.
D. It is recommended that licensed and bonded contractors be used to perform all phases of the work. It is required that licensed and bonded contractors be used for plumbing, electrical and any structural work involving floors, ceilings and loading bearing walls.
E. A statement that the work will be completed within six months from the time of the homeowner’s request.
F. A statement that the homeowner assumes all liability associated with the requested modifications.
3. Balconies and patios are exclusive use common area. No modifications are allowed and nothing may be permanently attached to them or to the building exterior.
4. Modifications to the gas system are not allowed. The only gas appliance allowed is one 15,000 BTU decorative fireplace in each unit. The gas system capacity and pipe size cannot accommodate anything more.
5. No changes to the building fire sprinkler system may be made without Board approval, including replacements. Any work done by a contractor other than the one under contract to the association may result in an inspection/certification charge to the homeowner.
*Painting walls, changing carpets, etc.
Procedure:
1. Homeowners are required to obtain from the city of Redondo Beach, Building division (415 Diamond Street, 310-318-0636), a letter and, if required, a building permit for any work they plan to do in their condominium, with the exception of the one-to one replacements referenced above. Please note that any work done without the required City permits is illegal and may prevent you from selling your unit or obtaining refinancing. It may also invalidate both the homeowners and the Association’s fire and liability insurance policies.
2. The Board will not provide written approval for any homeowner requested modifications until the homeowner completes the steps outlined in the Policy paragraph. A sample of a Board approval letter is shown on page 5.
3. If the City of Redondo determines that a building permit is required for the modification work, it can be obtained either by the homeowner’s contractor or by the homeowner himself. The City Building & Safety Division maintains a walk up counter to assist the homeowner in all phases of the remodeling including review of plans, permit requests, as well as answering questions. Attached (Attach. 1) is an information sheet on obtaining a city permit.
4. Upon receipt of the homeowner request letter the Board will formally vote at an open meeting on whether to approve, amend or disapprove the request. The Board will vote on the request within 30 days or receiving it. A letter similar to the example on page 5 will be issued to the homeowner.
5. Individual Board members will not, prior to the formal Board vote, provide any verbal assurances or feedback to the homeowner concerning the approval or disapproval of the request. This is to prevent the homeowner from later claiming that verbal Board approval had been given based on a discussion with one or more Board members. If the Board must later take legal action to have a homeowner modify or remove the modification to his/her unit, this will insure that the Association’s position is not legally compromised.
6. It is the Board’s primary responsibility to prevent homeowner’s from accomplishing any modification actions which are illegal (i.e., no building permit and/or conflict with the CC&R’s or Rules and Regulations or have not been approved by the Board. The Board does this two ways, one, by making the homeowners aware of the requirements and providing them information and two, by constant vigilance and early intervention. It is a Board member’s responsibility to investigate any work they see or become aware of, in any unit. They must insure that all requirements for the work (as outlined herein) have been met or they must immediately have the management company issue a "stop work" order.
7. At the time the Board votes to approve a homeowner request, one Board member should be assigned to insure that the required permits are provided in a timely manner and that arrangements with the homeowner are made to inspect the unit after the modifications are complete to insure that all work was completed as represented in the request.
8. The homeowner should be advised in the approval letter that it will be his responsibility to maintain a record of the written permission and all permits and to make them available to future Board upon request. This is to insure that modifications were made as approved.
9. Work may be performed within the hours of 8:00 a.m. and 5:00 p.m., Monday through
Friday. No construction may take place between December 15 and January 8. The homeowner is responsible to insure that the common areas are kept neat and clean on a daily basis during the modifications. The homeowner will be responsible for having the hallway carpets cleaned if they are soiled by the contractors. Any damage to the common areas will be billed to the homeowner. Workmen are not to dump building materials, used appliances, etc. in the trash rooms. All remodeling debris must be removed from the premises daily by the contractor. Contractors and workmen may nor prop doors open unless someone is posted to monitor the door to prevent unauthorized entry to the building. Any violations by contractors will result in an automatic fine, no courtesy warnings.
10. Construction to be completed within 120 days.
Rationale:
1. While this Policy and Procedure may seem unnecessarily detailed and restrictive, it is based on several unfortunate, historical examples of both homeowner and Board misdeeds which have
led to the wasting of tens of thousands of dollars in legal fees. The primary purpose of this procedure is to prevent the necessity for future legal action precipitated by homeowners modifications. Our Homeowner Association history is replete with examples of Association legal action which could have been avoided had the steps outlined in this procedure been followed.
2. Homeowner-initiated modifications have been the number one cause of Association legal actions, amounting to over $50,000 of legal fees. In 1985, Association legal action was brought against the owner of 406 for multiple changes to his unit that were made without Board approval or building permits. These infractions included many interior and exterior walls, tapping into the building gas system and installing a wood burning fireplace. All three of these examples were building safety issues. Then in 1997, legal action was threatened against a new owner of 406 for subdividing the unit and installing a second kitchen without approval or permits. Then in 2001, legal action was brought against the owners of 518 for tapping into the building gas system. There are other examples of non permitted modifications being made to units where Board member complicity through inaction or verbal, unofficial comments prevented later legal action from being taken.
3. The City of Redondo maintains a listing of all permits that have been approved for our building.
4 Attachments:
1. Sample Homeowner Letter
2. Sample Board Approval Letter.
3. Contractor Rules
4. Guidelines for Homeowners
Attachment 1
SAMPLE HOMEOWNER LETTER
P&P No 10
Date: _______
To: Casa Bahia Board of Directors c/o Bali Management
From: Mr. & Mrs. Homeowner
Owners of Unit #_________
Subject: Proposed Modifications to Unit #_______
1. We are planning to have the following work done in our unit:
A. Remodel the upstairs bathroom by replacing the sink and cabinets, add recessed lighting and replacing the tub with a shower.
B. Remodel the kitchen by replacing the electric stove with a double oven and adding a separate electric cook top.
C. Relocating the spiral staircase.
D. Replacing the gas logs and refacing the fireplace.
E. Removing the carpet in the hallway and replacing with tile.
2. The attached architectural plans provide the details of the remodel described above.
3. The City of Redondo has reviewed this letter and the plans and has determined that two permits will be required, an electrical (for the oven and cook top installation) and a mechanical permit (for the relocation of the staircase). We will obtain these permits after we receive Board approval and will provide a copy to the Board.
4. We will use only licensed and boded contractors. We have chosen Rainbow Contractors, 123 Main Street, Torrance, as our electrical contractor but have not yet selected the structural contractor.
5. Work will start about mid February and should be completed by the end of March.
6. We accept present and future liability associated with these modifications and in no way hold the Association responsible for the, if approved. The Board is welcome to inspect the modifications at any time.
Attachment 2
SAMPLE BOARD APPROVAL LETTER
P&P No.10
Date: ________
To: Mr. & Mrs. Homeowner
Unit #__________
From: Casa Bahia Board of Directors
Subject: Proposed modification to Unit #______, your date letter.
1. We have reviewed your subject letter and plans and are pleased to inform you they have been approved subject to the following conditions:
A. Copies of the building permits/applications are provided before work is initiated.
B. The new gas logs do not exceed 15,000 BTU’s.
C. Removing the carpet in the hall will still allow you to the CC&R noise requirement.
D. Provide the names of all your contractors before work is initiated.
E. The Board will have the right to inspect all work.
2. You are reminded that the Rules & Regulations state that work may not begin before 8 a.m. Or continue after 5 p.m. No work may be done on Saturday or Sunday.
3. You are responsible to insure that your contractors:
A. Clean up after every work day (i.e., halls, elevators, etc.)
B. Haul away their trash and not use the building dumpsters.
C. Do not prop open building doors or leave open building security doors unattended.
D. Do not use unauthorized parking spaces or block access to resident parking spaces.
4. Violations of the Rules & Regulations or CC&R’s by your contractors will result in fines being assessed against you.
5. All modification work must be completed within six (6) months of this letter.
6. The Board assumes no liability, current or future, for the work that has been approved.
7. Upon completion of the approved work, you will provide the Board with the final inspection report and schedule an appointment for the Board to inspect the modifications.
8. It will be your responsibility to maintain a written record of Board approval and City permits and to provide them to future Boards upon request.
Attachment 3
P&P No 10
CONTRACTOR RULES FOR WORKING
IN THE 535/555 ESPLANADE BUILDING
1. Contractors must be licensed for the work they are performing.
2. Contractors must carry liability insurance.
3. Work hours are from 8 AM to 5 PM, Monday-Friday.
4. This is a secure building, doors/gates are not to be propped open or left unlocked. Your homeowner will be fined if you leave any building doors/gates unsecured.
5. You may not park illegally in the building. Your homeowner will be fined if you park illegally. There are two 15 minute parking places on G-1 you may use for loading and unloading providing you do not exceed 15 minutes.
6. You must haul away any debris from your work site and cleanup the common areas at the end of each day. You may not use the building dumpsters to dispose of any debris as per City of Redondo Code.
7. You must obtain all necessary building permits for the work you are to perform.
8. You may not block or partially block the driveway with your vehicle. Do not park in the red zone in front of the building. Use the center lane in front of the building for loading and unloading.
9. If you remove the ceiling in the elevator, please replace it by the end of the day.
10. Cleanup any mess you have made in the hall, lobby, stairways or elevator
at the end of each day.
Board of Directors
3 October 2006
Attachment 4
P&P No 10
CASA BAHIA
GUIDELINES FOR HOMEOWNER
CONDOMINIUM MODIFICATIONS
Policy:
1. Before doing any work in their units, other than routine maintenance*, homeowners must obtain written permission from the Board for all modifications they plan to make to the condominium units.
2. In order to obtain written permission from the Board, the homeowner must apply to the Board in writing for permission. The homeowner’s letter to the Board must be similar to the example on page 3, and contain the following information;
A. A detail description of the changes to be made.
B. A detail drawing, containing dimensions and materials to be used, in accomplishing the requested work.
C. A statement from the City of Redondo Beach, Building Division, stating that the homeowner's letter and drawings have been reviewed and building permits are either required or not required for this work.
D. A statement that licensed and bonded contractors will be used to perform all phases of the work.
E. A statement that the work will be completed within six months from the time of the homeowner’s request and that the construction phase will last no more than 120 days.
F. A statement that the homeowner assumes all liability associated with the requested modifications.
The only exception to this policy are exact one-to-one replacements of appliances and fixtures, which do not require any plumbing, electrical, structural or other changes.
3. Balconies and patios are exclusive use common area. No modifications are allowed and nothing may be permanently attached to them or to the building exterior.
4. Modifications to the gas system are not allowed. The only gas appliance allowed is one 15,000 BTU decorative fireplace in each unit. The gas system capacity and pipe size cannot accommodate anything more.
5. No changes to the building fire sprinkler system may be made without Board approval, including replacements. Any work done by a contractor other than the one under contract to the association may result in an inspection/certification charge to the homeowner.
*Painting walls, changing carpets, etc.
Procedure:
1. Homeowners are required to obtain from the city of Redondo Beach, Building division (415 Diamond Street, 310-318-0636), a letter and, if required, a building permit for any work they plan to do in their condominium, with the exception of the one-to one replacements referenced above. Please note that any work done without the required City permits is illegal and may prevent you from selling your unit or obtaining refinancing. It may also invalidate both the homeowners and the Association’s fire and liability insurance policies.
2. The Board will not provide written approval for any homeowner requested modifications until the homeowner completes the steps outlined in P&P 10. A sample of a Board approval letter you must have is an attachment to P&P 10..
3. If the City of Redondo determines that a building permit is required for the modification work, it can be obtained either by the homeowner’s contractor or by the homeowner himself. The City Building & Safety Division maintains a walk up counter to assist the homeowner in all phases of the remodeling including review of plans, permit requests, as well as answering questions.
4. Upon receipt of the homeowner request letter the Board will formally vote at an open meeting on whether to approve, amend or disapprove the request. The Board will vote on the request within 30 days or receiving it. An approval letter similar to the example will be issued to the homeowner.
5. Statements from individual Board members should not be construed as permission. Unless you have received a formal letter of approval, no approval has been granted.
6. It is the homeowners responsibility to maintain a record of the written permission and all permits and to make them available to future Boards upon request.
7. Work may be performed within the hours of 8:00 a.m. and 5:00 p.m., Monday through
Friday. No construction may take place between December 15 and January 8. The homeowner is responsible to insure that the common areas are kept neat and clean on a daily basis during the modifications. The homeowner will be responsible for having the hallway carpets cleaned if they are soiled by the contractors. Any damage to the common areas will be billed to the homeowner. Workmen are not to dump building materials, used appliances, etc. in the trash rooms. All remodeling debris must be removed from the premises daily by the contractor. Contractors and workmen may not prop doors open unless someone is posted to monitor the door to prevent unauthorized entry to the building. Any violations by contractors will result in an automatic fine, no courtesy warnings.
P&P No. 11
End of Year Allocation of Unused Funds
14 April 2004
| policy_11.pdf |
Date: 14 April 04
P&P No: 11
CASA BAHIA
POLICY & PROCEDURE
Subject: End of Year Allocation of Unused Funds
Purpose: To establish the proceedure for handling any unused and unallocated operating
funds at the end of the fiscal year.
Policy: At the end of the fiscal year, the treasurer will review the ending balance in the
operating fund and any approved proposals which have been completed but not yet paid,
including any reserve allocations which need to be transferred. Any funds in excess of
$25,000.00, which is the average monthly balance forward, will be transferred to the
reserve fund to increase the Association percentage of funding.
| word_pro_-_pp__12_decision_criteria.pdf |
P&P No.12
25 April 2006
Decision-Making Criteria For Board Members
P&P No. 12
Date: 25 April 2006
CASA BAHIA HOMEOWNERS ASSOCIATION
POLICY AND PROCEDURES
Subject: Decision-Making Criteria For Board Members
Purpose:. To provide decision-making guidelines for board members to assist them in making informed decisions that will be consistent with related board documents and fair to current and future homeowners.
Background: History has shown that most board members inherently want to support their fellow homeowners, particularly if that homeowner is vocal and appears to be committed to a specific course of action. Board members, like most homeowners, want to be liked and because they have volunteered their time to participate in the management of the Association, they may be predisposed to go along with most any "reasonable" request for board action from their fellow homeowners. While this is a laudable initial attitude, board members must remind themselves that they have a greater moral and legal responsibility to the Association to carefully examine every issue that they will vote on to insure they understand the legal implications and the impact it will have on the majority of the homeowners. A seeming simply issue, deviation or policy which is quickly approved by a board without much discussion or analysis, can trigger future unintended consequences that can have a detrimental effect on the Association and it's homeowners.
Every board director has a responsibility to understand his or her fiduciary duty to perform due diligence. Fiduciary duty means a duty to act for the benefit of the majority of homeowners while subordinating your personal interests to that of the Association. This is the highest standard of duty implied by the law. Failure to consider all aspects and consequences of an issue before voting is a breach of fiduciary duty because due diligence was not performed. Board members can legally be held personally responsible for the unintended consequences when this occurs. So while you, as a board member, may hold a personal view on a particular issue, it is important to remember that you are legally bound to vote, not your personal preference, but in support of the side of the issue that benefits the majority of the homeowners.
Procedure: To assist board members in evaluating both sides of an issue and its' impact and consequences to the majority of the homeowners, it is recommended that you ask yourself four basic questions about the issue under discussion prior to voting on it. This is particularly important when considering special requests from individual homeowners, such as unit modification approvals.
1. Does the board have the authority to approve this issue/request?
Boards do not have the power to approve or disapprove all issues. The CC&R's and Davis-Sterling define the limits of the board's authority. Check these documents before voting on any unusual requests or issues. For example, boards may not sell common area to homeowners and our board cannot change the 3 tier dues system without 100% agreement of the homeowners and mortgage holders. It may be necessary to engage legal counsel if there's is any question about whether the board can decide on an issue/request.
2. Is the issue/request permitted by our Rules and Regulations and CC&Rs? Check the Association's legal documents before approving a request/issue to ensure it is not specifically disallowed. Aside from creating an embarrassing situation if the board approves something that is not permitted by our documents, it also may creates an unnecessary legal problem for the Association.
3. Is approving this issue/request in the best interests of the majority of the homeowners and will any individual homeowners or the Association be worse off or inconvenienced because of it?
Remember not to get too focused on the details of an individual request and forget to take a step back and look at the impact a request will have on the majority of the homeowners. Even if a specific request does not benefit any other homeowner it still may be OK to approve it if the board can be 100% sure that its' approval will not result in any detrimental consequences to other homeowners or the Association. This should be the primary focus for the board in determining whether to approve or disapprove a homeowner's request.
This is one of the most difficult questions to answer because it requires some creative thinking outside the box.A seemingly straightforward request can sometimes result in problems years down the road. Case in point, a prior board approved an owner's request to add a second access door to his two-story unit for fire safety reasons. Years later, a new owner illegally subdivided the unit and rented out the second floor because it now had a separate entrance. Unintended consequences are hard to predict so the best rule is, " Never grant any exceptions are deviations from the Rules and Regulations and CC&R's."
4. Am I prepared to approve this same request from any and all homeowners in the future?
Ask yourself, would our community environment, building and association be better off if this were approved for everyone? If one or two or more homeowners want approval to do the same thing next year or five years from now, are we as a board, ready to approve it? If the answer is not a resounding "yes", then it should definitely not be approved. Because if you approve it now, for one homeowner, the next homeowner looking for approval is going to say; " Well, you approved a request like this in the past, how come you won't approve mine?" A board must act consistently in their decisions and actions or leave themselves open to charges of discrimination or favoritism. There is no legal recourse for the board, should this situation occur.
By carefully considering the answers to these four questions, it is hoped that the board can make informed decisions that benefit the majority of the homeowners while keeping themselves and the Association out of legal trouble.
| word_pro_-_pp_13_floor_coverings.pdf |
P&P No. 13
Date: 13 Dec 2006
CASA BAHIA HOMEOWNERS ASSOCIATION
POLICY AND PROCEDURES
Subject: Condominium Floor Covering Requirements
Purpose:. To provide guidance and information to homeowners regarding the requirements for floor coverings in individual condominium units.
Requirements: Our CC&R's ( Article III, paragraph 5) stipulates that every homeowner/resident is entitled to the quiet enjoyment of his home and no homeowners/resident may interfere with this right. Our building was constructed so that each unit would meet a minimum floor insulation rating of 65IIC. This requirement is specified in Exhibit C., paragraph m, of our CC&R's. In order to achieve this rating, all the condominium units were initially finished with wall-to-wall carpeting and pad in the living areas (living room, dining areas, hallways and bedrooms) and acoustic treated ceilings thought the unit to attenuate the noise. Changing the floor covering from carpet to a hard surface significantly reduces the IIC rating to well below the minimum rating of 65 and increases the amount of reverberent noise in the unit which is transmitted through the common walls.
Policy: In a multifamily building, such as ours, noise is a reoccurring problem and a major source of friction between neighbors. The board has a basic responsibility to protect the homeowners right to a quiet home environment while working to minimize the noise problems between units. In order to determine if the requirements of the CC&R's could be met will hard surface floors, a Certified Noise Control Engineer was hired to conduct testing of samples of hardwood, tile and cork flooring, all with a double layer of acoustic underlayment.Based on the technical data obtained (Ref 3) and the floor construction in our building, it is evident that ( without structurally modifying the floor) the sound insulation requirements for flooring in our CC&R's can only be met with wall-to-wall carpeting and pad.
The board, therefore, will not approve the replacement of wall-to-wall carpet with hard surface flooring where there is another unit below unless the owner can present technical data which clearly demonstrates that the new covering will result in a minimum floor insulation rating of 65IIC (Impact Insulation Class). This must be obtained by a Certified Noise Control Engineer and a written report and test results provided to the board.
Homeowners whose units are on the slab or have no other unit under them, may request permission to install hard surface flooring with underlayment. This must also be installed with either side insulation or an air gap on common walls, including common area hallway walls.
Hard surface flooring will continue to be allowed in kitchens, baths, and entryways (within 6 feet of the front door). Again, this must be installed with underlayment and either side insulation or an air gap on all common walls.
Homeowners who have hard surface flooring that was installed without board permission will be required to replace it with wall-to-wall carpeting and pad either the time of sale or when the flooring is replaced, unless there are noise complaints from the unit below. In this case the flooring must be replaced immediately.
Data: ( Data and conclusions taken from Ref #1). Most condominium floors, both solid concrete and wood framed construction which provide adequate airborne sound installation, will provide adequate footstep noise insulation if finished with carpet and underlay. In all concrete buildings, normal footstep noise is virtually inaudible in spaces located below carpeted rooms, while in wood- frame buildings, only a low frequency thudding sound is sometimes audible, particularly from heavy walkers or if the floor has no concrete topping layer board or is exceptionally flexible. However, when the carpet and underlay are removed and replaced with hardwood, tile, cork, vinyl flooring, footstep noise becomes much louder, as well as brighter in character. This is generally found unacceptable to people living below, particularly in high end buildings or areas where background noise levels from traffic or other exterior sources are very low.
Many resilient materials are marketed as a means of controlling the noise created by footsteps on hard surface floors, such as hardwood and tile. While these sheets or mastic underlay products are quite effective at reducing the brightness of impact sounds, they are generally quite thin and when applied over the entire floor, are not sufficiently resilient or soft to provide effective isolation against the mid and lower frequency components of impact noise. As such, their performance can not approach that of carpet and underlay.
The floor construction in our condominium units consists of a basic wood floor with a concrete topping layer with an uninsulated cavity between the 5/8" gypsum board ceiling in one unit and the plywood underlay in the unit above. This type of floor construction has an IIC rating of about 25 for the bare floor and 65 if it is carpeted. Another words, the carpet accounts for a 40 IIC increase in sound insulation. Removing the carpet and replacing it with a hard surface, like tile or wood flooring, on top of the plywood underlay only increases the sound installation by 15 to 20 IIC for a total of 45, which falls far short of the 65 IIC requirement. With an IIC of 45 or less, normal walking is clearly audible below, as well as impacts from the movement of chairs and drop objects. This level is unsuitable for multifamily units or where moderate isolation is required within the same dwelling unit. At an IIC level of 60 to 70, normal walking is audible only during very low background noise situations. This level is adequate for most multifamily buildings. Additionally, footsteps on a hard surface becomes much louder as well as brighter in character in that it no longer sounds like a dull thud but contains middle and high frequency components as well. This leads to an increase in the reverberent sound in the unit which amplifies the level of sound which is transmitted through the common walls as well as the floor.
The common walls in our building are uninsulated single wood 2x4 stud construction which typically provides an STC of 32. If sound insulation material is blown into the wall, the STC can be raised to 36, which is about the best that can be achieved with this type of construction. The City of Redondo Beach Building Division (Ref 2), by comparison, requires that all new construction for residential condominiums have walls that will meet a minimum STC rating of 55. In order to achieve this rating the wall must be constructed with double 2x4's, have a third 5/8" gypsum board and be insulated. Because our building has the older, simpler wall construction, even the normal sounds of living, emanating through the common walls, can be a problem. This is why it is important that floor noise from hard surfaces not be allowed to add to the overall level of noise within a unit. Each 10 point increase in the STC means that noises coming through the wall will be roughly half as loud. At an STC of 35 to 40, normal speech is audible, and at times, words can be understood. An STC of 50 to 55 will assure speech privacy and in most situations and will be generally adequate for typical multifamily units.
Procedure: A homeowner wishing to replace the wall-to-wall carpet in his unit with some other floor covering or wishing to obtain approval for an existing non-carpet floor, shall submit to the board, a written report data based on tests performed by a Certified Noise Control Engineer that it meets the minimum IIC and STC requirements as specified herein. This testing will be done entirely at the homeowners expense. The board will evaluate the data and report, obtain expert opinion when necessary, and provide the homeowner with an approval/disapproval letter within 60 days of receiving the homeowners request letter.
References:
1. City of Vancouver Noise Control Manual, prepared by Wakefield Acoustics Ltd., Victoria, B.C.
2. Sound Attenuation Requirements for Residential Condominiums, City of Redondo Beach Building Division. November 2000.
3. Davy & Associates, Inc. report. September 18, 2006
| word_pro_-_pp_14_kitchen_verticals.pdf |
P&P No.14
6 February 2009
CASA BAHIA
POLICY & PROCEDURE
Subject: Maintenance and Cleaning of Common Area Vertical Kitchen Lines and Horizontal Main Drains
Purpose: To fulfill the Association's obligation to maintain the common area plumbing in order to prevent build up in the kitchen and lavatory drain lines and thereby preventing back ups and potential property damage to individual units and the common area. It is the Association's intention to clean at least one of the eighteen vertical kitchen stacks per month thereby insuring that all lines are cleaned every eighteen months. The lavatory vertical will be cleaned every other time, or once every 36 months. The horizontal drain for that stack will be hydro-jetted at the same time. In the past Bert Meli's office has attempted to schedule these clean outs by calling homeowners individually. This proved to be inefficient and time consuming due to a lack of response by the homeowners to his phone messages. As a result the clean out program has fallen seriously behind schedule.
Procedure: The fourth Thursday of every month has been designated as the scheduled day for the building plumber, Bert Meli Plumbing, to send a crew out to clean at least one vertical stack. There are some units which do not share a common line with other units, these will be added to the work schedule with another stack to reduce the number of trips needed and avoid the need to schedule during the holiday months. A reminder notice will be delivered to the unit approximately 1 week before the date.
At least three months in advance a letter (see attached example) will be sent to all of the units involved of the date scheduled for their vertical clean out along with the other unit numbers involved. It will be the homeowners' responsibility to arrange access to their unit, either by personally providing access or making other arrangements and then notifying both Bert Meli and Emmy Carrio as to who that will be. The homeowner should be prepared to maintain this access for approximately 4-6 hours. The cabinets under the kitchen and lavatory sinks should be emptied in advance for easy access to the drain line.
It is absolutely necessary to have access to all units in a stack to make sure that the lines are flowing freely and that any obstruction is not pushed down and causes an overflow into another unit in the stack. There is a charge to the Association of $80.00 if the crew is unable to work because of lack of access. This charge will be posted to the homeowner who fails to provide access whether or not they have designated someone else to provide access.
If there are unavoidable circumstances and a homeowner must reschedule, it will be the homeowner's responsibility to coordinate with the other homeowners in the stack for an alternative date and to reschedule with Bert Meli by no later than Friday of the previous week
Attachment 1: Sample Letter to Homeowner
CASA BAHIA HOMEOWNERS ASSOCIATION
(Sample Letter, Atch 1, P&P 14 )
Date: 6 February 2009
To: Owners/Residents of Units
From: Board of Directors
Subject: Vertical Drain Clean Out
Your unit is scheduled for cleaning of the common area vertical kitchen and lavatory drain lines shared by the above units on:
THURSDAY, 26 FEBRUARY 2009
This clean out will begin a approximately 8:00 a.m. and will take approximately 6 hours. It is absolutely necessary that you provide access to your unit for the duration of this procedure. It is possible for debris or blockage to be pushed into another drain in the stack, blocking that drain, therefore, access to all units is required. You may provide this access yourself or designate someone else to provide it for you. If you designate someone else you must provide that information to Bert Meli Plumbing (310-530-3427) and to Ellona Hess at Scott Management (310-370-2696x21)
In the event that you or your designated person is not here at the appointed time, there is a charge of $80.00 by the plumbing company if the crew is unable to work because of lack of access. This charge will be posted to the homeowner's account who failed to provide access. This will be charged to you whether or not you designate someone else to provide access, so please be sure that you confirm these arrangements.
If there are unavoidable circumstances that require you to reschedule this date, it will be your responsibility to coordinate this with the other units in your stack and to then schedule this with Bert Meli, no later than the Friday preceeding the scheduled date.
Thank you for your cooperation in this most important project.
| word_pro_-_pp_15_hfc_.pdf |
P&P No. 15
15 July 2010
CASA BAHIA
POLICIES AND PROCEDURES
SUBJECT: Homeowner’s Financial Committee
PURPOSE: The Homeowner’s Financial Committee ( HFC) acts as an advisor to the Board. The HFC performs specific financial tasks for the Association and provides input, in the form of written reports, to the Board.
COMMITTEE MEMBERSHIP: The HFC is composed of not less than three, but no more than five homeowners plus the Association Treasurer, who will serve as co-chairperson. Homeowners wishing to serve on the HFC should submit their request in writing through the property manager. If there are more than five requests the Board will select the members by random drawing. The term of appointment shall be for one year at which time the board may elect to either reappoint the member or select from other homeowners requesting membership. No more than one homeowner per unit may serve at any one time.
POLICY:
The HFC shall elect a co-chairperson who will direct and manage the committee’s activities. The co-chairperson will be the single interface between the committee and the Association Treasurer.
The HFC committee members have the responsibility to educate themselves with respect to the financial documents and accounting principles used by the Association.
The Board Treasurer will assist the committee in obtaining an understanding of the financial issues and obtaining information as time allows since the Treasurer’s basic responsibilities are very time intensive.
The HFC shall not directly task the management company or the property manager in the performance of their duties. All requests for financial information and assistance shall come from the HFC chairperson and be directed to the Association Treasurer. Questions regarding other issues, such as policy/decisions for expenditures shall be directed to the Association President or the Board Member responsible for an individual project in question. If the management company is needed to provide information, they will be tasked by the Association Treasurer.
If it is jointly determined that a meeting with the management company and the HFC is required, the Association treasurer will schedule it and will participate in the meeting.
PROCEEDURE:
The HFC co-chairperson and the Association treasurer will meet, at the request of the co-chairperson to discuss and agree upon the tasking for the committee. The committee as well as the treasurer, may propose the subject for their study.
When the subject, objectives, product and schedule for the study are agreed to, the co-chairperson will commit it to writing and the Association Treasurer will endorse it and forward it to the Board for approval.
When the study has been approved, the Association treasurer will assist the HFC co-chairperson, as time allows, in accomplishing the study.
Since most activities in the financial calendar are schedule driven, the HFC co-chairperson shall have the responsibility to complete the study and provide the recommendations by the deadline agreed to in the study document. The report and it’s conclusions and recommendations must represent a majority of the committee members.
This report shall be submitted to the Association Treasurer, who will review it and discuss it with the HFC committee for possible changes.
The Association Treasurer will then either endorse the report or attach a separate recommendation to the study and then forward it to the board for review.
The board will then schedule a discussion of the report at a monthly board meeting.
| word_pro_-_pp_16_emergency_procedures_with_attach.pdf |
P & P # 16
26 June 2007
CASA BAHIA
POLICES AND PROCEDURES
Subject: Emergency Procedures and Checklists
Purpose: To provide guidance for board members (and information for homeowners) as to what actions they need to take in the event of a building emergency.
Description: This Policy and Procedure covers the most common building emergencies. They are:
1. Power Outage
2. Water Leaks
3. Earthquakes
4. Fire and Fire Alarms
Policy: In the event of any building emergency, each board member has a responsibility in the duty to take action to:
1. Insure the safety of the residents.
2. Contain and minimize the damage.
3. Report the emergency to the proper authorities.
4. Assist the on-scene professionals.
In order to carry out the above responsibilities, each board member is expected:
1. To be familiar with all the building utilities and common area assets which includes knowing the location and function of the common area electrical switches and plumbing valves.
2. To have keys ( and know where they are) to all the building common area rooms, utilities, electrical boxes and doors.
Attached to this Policy and Procedure are four ( 4 ) attachments which serve as Emergency Checklists and a listing of the Building Utilities for board members to use in responding to building emergencies.
5 Attachments:
1. Checklist-Loss of Building Power
2. Checklist-Building Water Leaks
3. Checklist-Earthquakes
4. Checklist-Fire and Fire Alarms
5. Building Utilities
P&P 16
Attachment 1
EMERGENCY CHECKLIST
FOR
LOSS OF BUILDING POWER
CHECKLIST
1. Check Both Elevators
2. Determine Source of Power Failure
a. So Cal Edison (SCE)
b. Bld Circuit Breakers
3. Lock the Gate in Up Position
4. Check Emergency Lights
1. Check Both Elevators:
Check both elevators to determine if there any trapped residents inside. Your first step is to calm the occupants. Historically, if it is a California Edison problem, there is a 95% chance the power will be restored in less than an hour and a 99% chance it will be restored in less than two hours. Therefore, the occupants of the elevator need to be reassured that there is no danger and that they will most likely be freed in less than an hour.
There are emergency lights in the elevator and a phone that allows the user to connect directly to the elevator company. Tell the occupants to use the phone to report the fact that they are stuck in the elevator.
Try to determine if the elevator is at a floor or stuck between floors. If the elevator is at a floor then it is safe to try to force both the outer door and the inner elevator door open. It is recommended that this only be tried if the occupants have been in the elevator for over two hours. The danger in forcing the doors opened is that if the power comes and the elevator starts to move as the occupants are trying to get out to the elevator, they could be seriously injured if they are caught between the elevator cab and floor.
2. Determine the Source of Power Failure.
a. SCE
b. Building Circuit Breakers.
Southern California Edison: The source of the power failure is most likely SCE. To confirm, go outside and check the other buildings on the Esplanade to determine if they have also lost power. If they have, then it is a SCE problem. Call them ( 800 684-8123 Acct # 2034996595 )and determine the nature of the problem and get their estimate as to how long the power will be out in our section of the city.
Building Circuit Breakers: Check the Electric Room on G-1 for a failed main circuit breaker. You can visually tell if a breaker has been tripped because it will be in a different position than the other breakers in that row. If you find a tripped breaker just flip it to the "on" position. If only a particular floor or section of our building is without power, then check the circuit breakers in the Maintenance Room on G-1 and in the box on the south wall by the gate on G-1 using the same procedure. If none of the breakers appear flipped, try turning them all off and on. If this does not fix the problem, call the building electrician.
3. Lock the Garage Gate in the Up Position. The garage gate mechanism is equipped with a backup battery that allows the gate to operate without power for a minimum number of times. Board members have a key, which operates the garage gate power switch which is located on the lower right side ( south) of the gate on the outside of a small white box. Take your key and turn the power switch to the off position. This will automatically activate the backup battery and raise and lock the gate to the up position.
The second way to raise the garage gate to allow residents to enter and leave the garage during a power out condition, is to remove the side cover of the drive mechanism located on the garage ceiling and turn the belt drive with the heel of your hand. This will very slowly raise the gate to the up position. This is a safe, but cumbersome and time-consuming procedure.
There is a third way to raise the garage gate but it is not recommended because of the dangers involved. Turn the power switch to the off position before using this method. The garage gate itself can be disengaged from the chain drive mechanism by squeezing the quick disconnect latch located on the arm that connects the gate to the drive mechanism. Once this is done, the garage gate is free to slide up and down on the outer tracks. The problem is the gate itself weighs several hundred pounds, and once disconnected from the arm, it is free to crash down on the people or cars below. It takes several people to manually raise the gate using this method and once in the up position, the gate must be either reconnected to the arm or firmly secured with rope to prevent it from inadvertently sliding down to the closed position. If you happen to be under the gate when this happens, you will not be a happy camper..
4. Check the Building Emergency Lights. The only time the effectiveness of our emergency lighting system can be checked is during a power outage. The emergency lights, should come on immediately after a loss of power and should stay on and from two to four hours. Within the first hour of a power outage, all the emergency lights and exit lights, should be on. In order to ensure that they are functioning properly, the entire building should be checked. This includes the lobbies, hallways, stairwells, and garage areas. Take a flashlight and some masking or colored tape and place a piece of tape on all the emergency lights and exit lights that are not working. After power is restored, contact the management company and report the number of lights that need to be replaced. The tape will mark the nonfunctioning lights for the contractor.
P&P 16
Attachment 2
EMERGENCY CHECKLIST
FOR
BUILDING WATER LEAKS
CHECKLIST
1. Determine Source of Leak.
a. Fire Sprinkler System
b. Bld Water Supply
- Homeowner's Unit
- Common Area Pipes
1. Determine the Source of the Leak.
a. Fire Sprinkler Water Supply: The first step is to determine if the water is coming from the fire sprinkler system since this will cause major building and unit damage in a matter of minutes. If water is flowing through the fire sprinkler system the building alarms should be ringing.
The building fire sprinkler system has a separate water supply and is not connected to the building water supply system. The Fire Department is normally required to shut off the sprinkler water supply either where it enters the building on the Esplanade or by turning off the individual sprinkler shutoff valves which are located in a cabinet on each floor.
If a sprinkler head has been inadvertently knocked off or activated by heat ( other than a fire ) the water damage will be extensive and quick action is required. If the alarms are sounding, an emergency signal has already been sent to our fire system monitoring company and they in turn, call the Redondo Fire Department on Pearl and Broadway.
Your first step, is to call the Fire Department to ensure that they have received the call from the fire system monitoring company. Even if there is no fire but an inadvertent activation of the sprinkler/s, the Fire Department can help contain the water damage.
You then need to verify whether we have an inadvertent fire sprinkler head/pipe problem, a false alarm or a real fire. If there is no fire danger but water is flowing from a broken sprinkler head, you can open the hallway cabinet on the floor where the sprinkler head has been activated and shut off the water supply to the broken head. The valve to shut off the fire sprinkler water will be chained so it cannot be inadvertently closed. If the Fire Department has not yet arrived, it is possible to cut or break the chain and close the valve so that the water damage is minimized. The chain can be broken by finding the link that has been scored and hitting it with a hammer or cutting a link using the bolt cutters in ther maintenance room
Careless contractors are the primary cause of damaged fire sprinkler heads in the building which have caused major water damage. Although the Fire Department is equipped to provide major assistance so that the water damage is minimized, your quick action in turning off the water supply can save thousands of dollars worth of damage to units and the building.
Homeowner's Unit: The majority of the leaks in a vertically stacked building such as ours, originate in the homeowner’s unit and is usually discovered when water seeps into the unit or common area below. It is not unusual for a leak to be in a homeowner’s unit on the fourth floor and be observed leaking into a homeowner’s unit on the second floor, skipping the third-floor entirely. This can occur because water runs downhill and can easily flow out 5 or 10 feet horizontally from the actual source before leaking down into a unit. If the leaking water intersects a vertical pipe, the water can easily flow down the pipe and past one floor before hitting an obstruction on the floor below. That is why you need to be prepared to check all the units in that particular vertical stack.
Finding the source of a leak is the most difficult part of solving a leak problem. Time is of the essence in minimizing property damage if the leak is major, such as a ruptured washer line in an unoccupied unit.
The most common sources of leaks in a unit are;
a. Malfunctioning/overflowing toilet.
b. Leaking backstop valves behind a wall.
c. Leaking washer fill valves.
d. faucets left open during a building water shutoff event.
e. Dried-out or missing grout around tubs and showers.
f. Blocked drains.
The first step is usually to check the unit above where the leak has been observed. Check your building layout plans to determine what unit is above the leak and where the kitchen and bathrooms are in that unit to confirm that this is a likely candidate.
Getting into the unit to check for leaks is usually a problem because the owner/resident is likely not be home. If you're not positive the leak is coming from the unit, skip it and check the unit above. It's also possible that the leak could be coming from a unit adjacent to the one that is suspected of having the leak. Knowing where the kitchen and bathrooms are in each of the units ( since there is a high probability that this will be the source ) should help in narrowing down the likely source of leak. Again, consult your building layout.
The first step in getting into an unoccupied unit is to check the Owners List to see if they have left an emergency key to their unit with someone else in the building.
Next, call the resident if it's a rental unit or the owner or their management company, if they have one. We should have both work and emergency phone numbers for them in our Owners List. Owners are normally very cooperative if they think their unit is being flooded. Owners have been known to get their unit opened in 30 minutes or less under these circumstances.
If neither of these approaches work, you can either call a locksmith or if the leak is really major, turn off the building water using the main valve on G1. Using the latter approach will allow the water to leak until the pipes in the building are drained. This usually takes 20 to 30 minutes, however, you can expedite the process by opening faucets and drain valves in the building, on G4 and in individual units. Locksmiths usually take one to two hours to appear so this usually is the slowest method.
If you've got a panicked homeowner/resident on your hands because water is leaking down into their unit, you should do your best to calm them while helping them move furniture away from the wet area, and also place buckets to catch the water. If water is leaking through the ceiling, take a knife or screwdriver and open a small hole in the ceiling to allow the water to drain out. This will minimize the damage to the ceiling and allow the ceiling to dry more quickly once the leak has stopped. Ther are plastic drop clothes in the maintenance room which can be used to protected furniture.
Common Area Pipes: Most leaks in the building have been caused by homeowners and their failure to maintain their appliances and water valves ( i.e.backstop ) in their units. When a common area pipe does leak it is usually the cast iron pipes in the wall or garage that will develop pinholes or cracks due to age. Leaks can also occure when common area drains and/or pipes become blocked and the water backs up into the units. Fixing these type of problems usually require large sections of the wall or ceiling to be opened up in units in order to find and then repair the leak.
It is not unusual to have leaks in the walls go undetected for long periods of time and when it is finally found it usually requires expensive and extensive mould treatment. The only defense we have against these type of leaks is to ensure that the Board is implementing an aggressive plumbing maintaince program that includes cleaning out the common area vertical and horizontal lavatory and kitchen pipes on an annual basis.
P&P 16
Attachment 3
EMERGENCY CHECKLIST
FOR
EARTHQUAKES
CHECKLIST
1. Preparedness
2. Earthquake Gas Shutoff Valves
3. After the Shaking
4. Evacuation
1. Preparedness. Southern California has thousands of earthquakes each year. A few are damaging, but most are not even felt. The amount of ground shaking an earthquake depends on the magnitude, the distance from a fault, and the local soil conditions. Earthquake damage and loss can be limited by steps taken before, during and after. Most of the losses in earthquakes are from objects that break or fall on people causing injury as opposed to collapsing buildings. There are seven steps the board, and residents can take to reduce the risk of being injured or killed in an earthquake. The steps outlined below are discussed in great detail in a 2006 publication from the Southern California Earthquake Center (SCEC). This handbook can be found at www.earthquakecountry.info:
Before
1. Identify potential hazards in the building and in condo units.
2. Create a disaster plan.
3. Create disaster supply kits.
4. Fix potential problems.
During
5. Drop, cover and hold on.
After
6. Check for injuries and damage.
7. Follow disaster plan.
2. Earthquake Gas Shutoff Valves. The main manual shutoff valve for the building gas supply is located outside the east side of the building about 30 foot north of the gate as you stand on the sidewalk in front of the building. The gas supply to the building can be shut off by manually turning the valve which is located just below the gas meter.
Adjacent to this valve in the same gas line, is an automatic earthquake sensor valve which will automatically turn off the building gas supply when the sensor detects shaking in excess of 5.3 on the Richter scale. Should an earthquake trigger this valve it is recommended that the gas not be manually turned back on until the Gas Company is notified and can conduct an inspection of the building to ensure that there are no broken or leaking gas lines.
The problem we will have is that in an earthquake of this magnitude the Gas Company will be very busy and may not be able to conduct the safety survey of our building for several weeks. During this time we will be without hot water.
3. After the Shaking. First take care of your own situation. If it’s been a bad quake, chances are you’ll be on your own for the first few hours as rescue units will be overwhelmed. Implement your emergency plan and remember aftershocks may cause additional damage or items to fall so get to a safe location. Take your disaster supply kit.
Once you’re safe, it’s time to help others and check for damage. Do not move seriously injured persons unless there is an immediate danger of further injury. Provide medical assistance and get medical help for the seriously injured.
Check your condo and the building for:
a. Fires: If possible, put out any small fires, don’t wait for the fire department. There are fire extinguishers in the hall on every floor.
b. Gas Leaks: Shutoff the main gas valve ( if it is not already off ) only if you suspect a leak because of the odor or the sound of leaking gas. Do not turn the gas back on yourself, call the Gas Company and wait for them to check for leaks.
c. Damaged Electrical Wiring: Shutoff the power to your condo or to the building at the main breaker switch,( located by your electrical meter in the garage for your condo and in electrical room on G-1 for the building ) if there is any visible damage to the electrical wiring.
d. Broken Lights and Appliances: Unplug these as they could start fires when the electricity is restored.
e. Structural/Masonary Damage: Stay away from block walls as they may be weakened and could topple during aftershocks. Don’t use your fireplace.
f. Water Leaks: If you observe water leaking from the pipes supplying or carrying the main building water, shut off the building water using the valve on the east wall of G-1.
g. Downed Power Lines: If you see downed power lines, consider them energized and stay well away from them. Keep others away from them. Report this to the SCE or call 911.
If it is not necessary to evacuate the building but some of the utilities are off, special care must be taken not to cause additional damage. Until the building is cleared and it has been determined that there are no gas leaks, open flames must be avoided. Do not use lighters, matches, candles or grills or mechanical devices that can create a spark, such as light switches, generators and motor vehicles. Gas lanterns or heaters, gas or charcoal grills or gas generators should never be used indoors as they released deadly CO and can also be a fire hazard.
-Check on the condition of your neighbors. If the power is off, plan meals to use up refrigerated and frozen foods first. Food in the freezer should last for a couple days.
-Contact our insurance company to begin the claims process.
4. Evacuation. If your condo or the building is structurally unsafe or threatened by fire or other hazards it will be necessary to evacuate. However, emergency shelters may be overcrowded or initially lack basic services, so do not leave just because the utilities are out of service in the building or there is some visual damage. If you determine that it is necessary to evacuate the building, a roster should be kept of who is leaving and where they are going. If possible, the following items should be taken when you evacuate:
-Disaster Supply Kit.
-Medications and eye wear.
-Water, food and snacks.
-Sleeping bags, blankets and pillows.
-Jacket and change of clothing.
-Towels.
-Personal identification and insurance information.
-Money.
-Pets ( may not be taken emergency shelters ).
-Portable radio.
-Cell phone.
-Turn on your portable or car radio for information and safety advisories. Call your out-of-area-contact let them know what your status is and where you’re staying.
P&P 16
Attachment 4
EMERGENCY CHECKLIST FOR FIRE AND FIRE ALARMS
CHECKLIST
1. Determine if the Fire is Real or a False Alarm.
a. Fire Alarm System Information
b. Check Electric Room G-1
c. Check Fire Enunciator Panels
d. Check All Floors
2. If Fire is Real:
a. Call Fire Department
b. Meet Fire Department
c. Alert Neighbors
d. Evacuate Building
e. Assist Fire Department
3. If False Alarm:
a. Turn off Fire Alarm
b. Investigate Cause
c. Change Procedures to Eliminate Cause.
1. Determine if the Fire is Real or a False Alarm:
a. Fire Alarm System Information: The fire alarms will go off when one of two conditions exist;
(1) either there is water flowing in the fire sprinkler pipes and the sensors in the pipe have detected this condition and triggered the alarm
(2) or a contractor is testing the fire alarm system and has triggered the alarm from the alarm box in the electrical room or he, or a homeowner, has triggered the alarm from a remote station somewhere in the building. When the fire alarms are activated a signal is automatically sent to our fire alarm company Dispatch Center ( 1-800-228-0580 or 310 228-0580 ). They in turn, will call the Redondo Beach Fire Department ( 310 379-5416 )and fire trucks will be dispatched to our building.
In 99% of the cases when the building fire alarm goes off it is because a contractor is working either on the fire sprinkler system or the fire alarm system and has inadvertently triggered the alarm system.
b. Check Electrical Room G-1: If you know that a contractor is working on one of these two systems in the building then the first step is to check with the contractor to confirm that he has triggered the alarms by mistake. If you have no knowledge that a contractor is working in the building then check the electrical room on G 1, where the fire alarm system boxes are located, to see if a contractor has made an unscheduled visit to the building and is testing the system. If there is water flowing in the fire sprinkler pipes then we have a major problem that requires quick action even if there is no fire. Water damage will be extensive if a fire sprinkler head has been activated. Most of the time the cause of an activated sprinkler head is not a fire but rather a mistake by a contractor working in a homeowner’s unit who has either knocked a sprinkler head off or inadvertently heated the element causing the sprinkler to activate.
c. Check Fire Enunciator Panels. Before going floor to floor to determine if there is a real fire or just a broken sprinkler head, check the both Fire Enunciator Panels located outside the building on the 555 and 535 entryways. These panels will indicate on what floor in the building the fire sprinkler system has been activated. As you approach this location in the building it should be obvious if the fire is real from the smell and the smoke. It also should be obvious if the alarm was triggered by mistake by either a contractor or a homeowner because you will more than likely encounter them in a panicked state due to the rising water on the floor.
d. Check All Floors. If there is a fire, call 911 immediately. If there is no fire but water is flowing from the fire sprinkler system, call 911 immediately. The Fire Department will turn off the fire sprinkler water and assist in the water cleanup. If there is no fire and no water flowing you may consider shutting down the alarm system. However, it is likely the Fire Department is already on its way to the building and they should shut down the alarm system. If you need to shut down the alarm system, see paragraph 3 (a).
2. If the Fire is Real:
a. Call 911 immediately.
b. Meet the fire department on the Esplanade and direct them to the location and source of the fire.
c. Alert as many of the residents as you can ( without endangering your life) to the fire hazard and assist them in evacuating the building as necessary. Check both elevators to ensure that no one is trapped in the elevators.
d. Assist the fire department if requested.
3. If False Alarm:
a. Turn off the fire alarm. The fire department should have responded to the fire alarm, and once they have determined that there is no fire, they should have turned off the building fire alarm. If this did not happen then it may be necessary for you to turn off the fire alarm. The fire alarm bells can be turned off by accessing the red fire alarm box in the electrical room on G-1. Using your board key, open the red alarm box that has the small clear glass window in it. On the right side of the circuit board you will see two switches marked Zone 1 and Zone 2. Slide both switches to the off position, this will stop the alarms from ringing. Note that if water is flowing in the fire sprinkler pipes the alarms cannot be reset and the "trouble light" will remain lit. To turn the alarm bell system back on, push the "Reset" button on the circuit board, and then slide the Zone 1 and 2 switches to the on position. This should reset the entire system. If the red trouble light remains on, there is some other problem with the system and you should call the fire alarm system contractor to come out and check the system.
b. Determine the cause of the false alarm. This step is important so that future false alarms can be eliminated. False alarms are bad in two ways. First, residents become conditioned to the alarm bells ringing and fail to take actions which could save their lives if there were a real fire. Secondly, it costs the Association money in fine penalties from the fire department when they have to respond to false alarms. These penalties can escalate to hundreds of dollars.
As previously stated, contractors are the most likely culprits. However, if it is not obvious what happened it may be necessary to call the alarm company in order to establish the time the alarm went off and who, if anybody, was working in the building at that time.
c. Change Procedures to Eliminate Cause. Change the policies and procedures as necessary to eliminate, or at least minimize, the number of false alarms we are likely to have in the future.
P&P 16
Attachment 5 EMERGENCY PROCEDURES
BUILDING UTILITIES
Board members should familiarize themselves with the location of all utilities in the building so that during emergencies they are able to respond appropriately. The operation of selected utilities, such as shutting down the building water system, are described in the specific Policies and Procedures documents.
The following is a brief summary of our building utilities:
1. Hot Water/Heater Room.
This room is located on G1 and contains the hot water heater, the hot water storage tank, the hot water controller ( a computerized system for optimizing and controlling the hot-water heater), the two hot water recirculation pumps, the Jacuzzi heater, the three Jacuzzi jet pumps, the Jacuzzi sub panel circuit breaker box, the two on/off switches for the recirculation pumps, the timer box for the Jacuzzi pumps, a timer for the Jacuzzi filter motor and a timer for the Jacuzzi pool light.
2. Maintenance Room
This room is located on G1 and contains our building supplies (i.e. lights, paint, fixtures, etc.), the maintenance phone and answering machine, ladders, chairs, a bolt cutter, and the garage surveillance TV system. There are two timers for the outside building lights and circuit breaker box # 1 for the building hall lights, lobby, garage and pool light.
3. File Room
This room is located off the first-floor 535 stairwell by the elevator. It contains almost all the board packages since the Association was formed. Building plans and legal files are also in this room.
4. Electrical Power Room
This room is located in the northeast corner of G1. It contains the fire alarm panel and the main building power bus which includes the elevator power, garage exhaust fan power, and stairwell light power. There is also a timer for the 535 outside entrance lights and electrical meters for units 301-602.
5. Weight Room
This room is located off the first-floor 555 stairwell by the elevator. It contains some very basic and well used exercise equipment. A liability release must be signed before keys are issued to homeowners.
6. Sub panel #2 Circuit Breaker Box
This box contains a relay for the outside building lights and the garage gate. Next to this box is a timer for the 555 outside lobby lights. Both boxes are located on the south east wall of G1 near the gate.
7. Automatic Gate Opener
The electrical boxes that control the gate mechanism are located on the south wall by the gate and on the ceiling. The gate has an automatic eye that stops the gate from closing when there is an obstacle that deflects the beam. There is also two underground electromagnetic loops that will stop the gate from closing when a car is sensed under the gate. Should there be a power failure, the emergency battery will automaticly open the gate.
8. Building Gas Supply
The main shut off for the building gas supply is located outside the east side of the building about 30 ft. north of the gate as you stand on the sidewalk in front of the building. The shutoff valve is in the gas line below the meter. Also in this line is an earthquake automatic shutoff valve. The building gas will automatically be turned off if the earthquake sensor detects shaking in excessive 5.0 on the Richter scale.
9. Building Water Supply
The building water supply shut off valve is located on G1 by space # 162. The building water is shut down by slowly turning the right hand wheel clockwise. Prior to shutting down the building water, the two hot water recirculation pumps must he turned off to prevent them from burning out. A partial shut off of the building water for the units on the west side of the building can be accomplished by turning off the three water valves located on the G-4 ceiling by the foot of the car ramp.
10. Garage Ventilation System
The ventilation system consists of separately controlled fans on G1, G2 and G3. The fans are automatically controlled by carbon monoxide sensors on each of the four levels of parking. Each fan has its own on/off switch and should be checked monthly to ensure no one has inadvertently turned the fans off. If the CO on any floor exceeds a safe level, a white flashing light will come on and stay on until a safe level has been achieved on that level.
11. The TV Cable and Satellite System
The building is wired for cable and satellite TV. There is also an original building roof antenna system that is connected to the TV wall plates in each unit. The amplifiers for this system is located behind access panels in the hallways on levels five and six. There are cable junction boxes and satellite cable junction boxes located on G1 and G4. The cable company owns the cable TV cables in our building while the Association owns the satellite cables. The City has a contract with Time Warner to maintain the cable system and the Association has a contract with Consolidater Smart Systems ( was MultiBand until March 07 ) at 800 954-3434 to maintain our building DirecTV satellite system until 2008.
12. Landscape Irrigation System
The timer/controller for the irrigation system is located on G1 next to the building water turn off valve by space #162. The system consists of seven stations around the building each with their own turn off valves located in the ground. A map of the system may be found in the file room. The main water shut off for the system is located in the northeast corner of the property 3 ft. from the sidewalk in the bushes.
13. Telephone Terminal Box
This antiquated junction box is located on the east wall of G1 to the right of the garage gate. Also located in this area is an amplifier box for the TV satellite system and Fire Alarm System Automatic Dialer Box which alerts the Fire System Monitoring Company in the event of a problem.
14. Electrical Meters
The electrical meters and individual unit circuit breakers for units 100 -- 300 are located on G4 opposite parking space #62. The meters and breakers for the other units are located in the electric power room on G1.
15. Garage Sump Pump
There is an immersion sump pump in the garage G4 drain across from parking space #59. The off/on switch to the pump is located on the wall across space #60.
16. Elevator Control Rooms
There are two control rooms on G4 adjacent to each elevator. The control rooms contain the switching electronics and hydraulic pumps for the elevators.
17. Building Ventilation System
There are two ventilation fans on the 555 roof and the 535 roof. There are intake and exhaust motor fan units on each roof. These units supply fresh air to the building halls. There are fresh air vents adjacent to the elevator on each floor. These units should be lubricated twice a year and the belts replaced every 2 years.
18. Bicycle Storage Rooms
There are five (5) bicycle storage rooms in the building, one on each garage level and two on G-4. To use any of the storage rooms, residents must register their bicycle with the board, obtain a bicycle sticker and obtain a key to the storage room. A Policies and Procedures outlines his procedure.
| pp_17_weekend_emergencies.pdf |
P&P No. 17 WEEKEND EMERGENCY GUIDLINES
P&P No. 17
Date: 20 May 2012
Approved: 4 June 2012
CASA BAHIA HOMEOWNER ASSOCIATION
POLICY AND PROCEDURES
Subject: Weekend Emergency Guidelines
Purpose: To provide criteria to assist board members and the management company in
determining when to call contractors on the weekend to respond to building problems.
Background: Calling a contractor out on the weekend to fix a building problem is
a very expensive action. Contractor rates are usually 1 1/2 times or twice as
much as they are during the week. On the other hand, quick action getting a
contractor out to the property when there is a real threat of property damage or
personal harm can save thousands of dollars in building repair costs and avoid
personal injury.
Procedure: This P&P provides guidelines to help determine when a situation is a real emergency that has to be
acted on immediately by a contractor, and when it a prudent to wait until Monday
to call a contractor for repair work. Because each emergency situation can have a
very different circumstances, the information provided herein are only guidelines and not hard and fast rules.
1. Garage Gate Malfunctions: If the gate is open and not working: Not an emergency. While this represents an increased security risk due to the fact that anyone can walk into the garage, the building and residents still remains secure because the interior building doors are locked and cannot be accessed from the garage. Leave a message for the gate company to repair it on Monday.
If the gate is closed and not working: This is an emergency. Residents could have a medical emergency and not be able to get their car out of the garage. Call a board member to see if he/she can get the gate open. If not,
call the gate contractor to open the gate as soon as possible. The actual repair of the gate can wait until Monday.
2. Water Leaks: If a water leak is detected, and it is dripping into a common area;
It is not an emergency if the leak is small and a bucket can be placed under it to contain the water or if it is leaking into the garage where there are drains and no chance of property damage.
It is an emergency if the leak is large and is threatening to flood, or has flooded, a large area and/or is adjacent to a unit and, therefore, has the possibility of seeping into the unit. Call a board member who may be able to shut off the water supply and initiate the water cleanup by using our Wetvac. Both a plumber and a water remediation company should be called if water is already in a unit, in the hall, lobby or other common area rooms so fans can immediately be set up to dry the floor and
walls so that mold does not become an issue.
It is an emergency if the leak is from a sewer line. This is a health hazard and needs to be cleaned up immediately.
3. Loss of Building Electrical Power:
It is not an emergency if other buildings on the Esplanade have also lost power. This is a local power outage and will eventually be fixed by SCE.
It is an emergency if our building is the only building that has lost power. An electrical contractor will be needed to check/repair the building circuit breakers.
4. Fire Alarms Are Activated:
It is an emergency if the alarms go off.The Fire Department should be called immediately.
5. Elevator Malfunction:
It is an emergency if the elevator stops running and someone is trapped inside. Call the elevator company and the Fire Department.
It is not an emergency if the elevator stops running and nobody is inside. Leave a message for the elevator company so they can send a technician out on Monday.
6. Landscape Malfunction: If a broken sprinkler head is reported and water is shooting into the air, it is not an emergency. A board member should be called to turn off the sprinkler system. The water shut off valve for the sprinkler system is located next to the sidewalk on the extreme north east side of the property. A message should be left for the landscaping company to repair the sprinkler system during the week.
7. Swarming Bees/Wasps:If swarming bees/wasps are reported on the property and stay in the same location for an extended
period, and there is a danger that residents will be stung, it is an emergency. A bee handler/collector should be called to remove the
bees/hive as soon as possible.
If a bee/wasp hive is reported on the property but they are not swarming and there is little danger that a resident will be stung, it is not an emergency. A bee handler/collector should be called on Monday to remove the hive.
P&P 18 Water Leak Discovery/Emergency Response
| p_p_18.pdf |
P&P 20 Digital Locks For Homeowner Unit Doors
| p_p_20_digital_locks.pdf |
|
P&P 19 Attendance At Board Of Directors Meeting
|
| p_p_19_attendance_at_board_of_directors_meetings.pdf |
